Some personal background:
A retro build, and it took only about 30 years to realize it... ;-). This is a (more or less) OOB build of a classic Japanese mecha kit from the early Eighties, realized over the 2020 Xmas holidays in a kind of nostalgia flash and because I have been finally, after years of searching an hunting, able to get my hands on one of these vintage kits for a reasonable price. The "Run-Valam" kit from IMAI's "Megaro Zamac" model kit series is actually not really rare, and has never been - but sellers tend to call up irrational prices, apparently following the strategy "Well, if this kit online is that expensive, I'll have to charge that, too". Just ignoring that these things never change hands, and so the market remains static, if not comatose.
I bought one when I was around fifteen, at a local department store, when the mecha virus caught me. I found (and still find) it to be one of the most bizarre but also coolest mecha designs around - even though it never belonged to an anime series, IMAI's colorful "Megaro Zamac" model kit series were just robot kits, created and marketed to take a free ride on the robot hype of contemporary series like Gundam and Macross. It never had any media linkage.
However, in its ow right, the "Run-Valam" mecha is a weird and impressive design, maybe a Japanese Eighties interpretation of the Marsian War machines? Who knows...
Back then I built mine with youthful enthusiasm, less skill and poor tools. And it unfortunately fell apart after some years and a fatal crash from a bookshelf... Some of its bits and pieces are still around, though, partly taken as donors for mecha kitbashes. Nevertheless, when I became older, I still found the Run-Valam cool and tried to get hands on another kit for years, to build it again. This plan worked out now, even though with some tradeoffs: The kit was affordable and it came complete, but sans decals and instructions. The good thing: I still had the original instructions from my 1st Run-Valam kit archived, and without them you are pretty lost!
The plan was to build it close to the original (the box art is the only reference), even though the lack of decals will make things a bit complicated and I will have to improvise. I especially wanted to assemble it mechanically better, because it is quite complex, with lots of joints, but no PVC caps (it's a true 1st generation mecha kit) and a rather complicated "matryoshka" construction that calls for a step-by-step assembly, unlike more modern mecha kit designs which can be built in separate sub-assemblies. This made the build quite challenging, but I was willing to take it with patience.
The kit and its assembly:
Work started with the central hull, or better: its modification. Due to the "clamshell" cosntruction of almost everything, the legs are OOB to be "enclosed" by the hull halves. I will go for this solution for the central leg, but the outer legs will be detachable (and built separately) through an improvised internal joint construction, based on styrene tubes.
The mold quality is surprisingly good and the plastic is not - despite the kit's age - brittle, it's easy to work with the material. However, there's a lot to clean and the mold constructers put in many cases surface details onto the seams. Not really clever, but state of the art in the Eighties.
The kit requires some serious PSR almost everywhere, and there are some sinkholes and bugs like the round holes on the inside of the "toes", which are a production compromise to avoid massive styrene sections (and more seriosu dents from shrinking styrene). It goes to together surprisingly well, though.
Things are pretty complicated around the legs: For every two parts you glue together there's a joint without a vinyl cap to consider. Everything looks and feels wobbly and delicate, and it really is. The central upper end has a very different (and complicated) construction, with a round cograil segment that has to be placed into a slit in the leg under the uppermost joint, and then the hip (sort of) housing encloses the leg and the cograil has to be glued to it, while the leg is supposed to remain movable! Due to another poor mold solution (a kind of grill opening, which is integrated into the hip halves and the seam runs right through it in a recess, so there's no chance for clean PSR) I decided to modifiy the hip's front side with a perforated plastic cover. Some details were also sanded away for a better finish and then replaced with sytrene profile bits.
In the meantime, work on the hull made progress, in specific I created new joints for the outer legs. Styrene tube pegs were added to the legs, which fit into a central, bigger tube that runs across the hull. This way, the legs remain detachable and movable, and some rubber glue (photography stuff, normalle used to stick pictures into an album) later added some resistance and stability to the mecha model.
In order to improve/pimp the model I decided to open some intakes on the front side of the lower hull. This was quite easy, due to the depth of the molded areas, so that material from the inside could be milled away. Getting the small opeings into a more or less clean shape was tricky, though, and finally the openings were covered from the inside with some fine black plastic mesh.
The upper outer legs' fairings and the clever mechanisms inside of it deserve extra mention: There are two horizontal pegs which hold two mechanisms at once: You have the movable weapon stations that protrude from the fairings' tops, and the rest of the leg is held by a separate sliding suspension that allows the leg length to be adjusted by ~0.5". Not much, but enough to allow the Run-Valam to be presented in various walking positions.
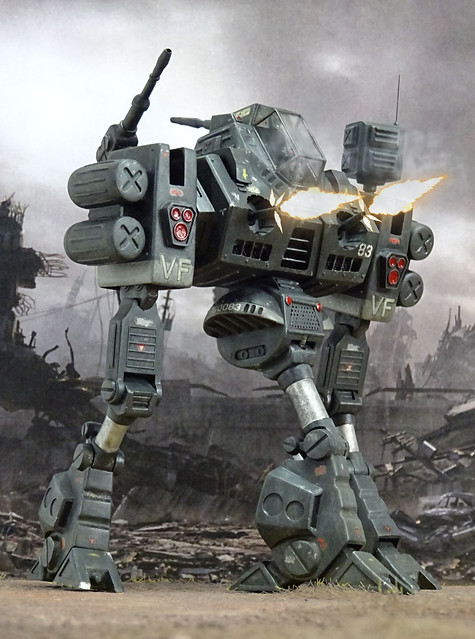
next came the spacious cockpit - another anachronistic design feature of this mecha. It rather looks like an opera loge or a conservatory. The OOB basis was retained, including the nicely molded, wee pilot figure that gives a certain impression of the Run-Valam's massive bulk in real life. I was not certain how to paint the pilot, orange was an initial option, but I think that the box art depicts a blue suit with a white helmet, so I went this route. In the black and grey environment, it still stands out well.
Inside of the cockpit I added some details to the blank side walls with sytrene bits. I furthermore moved the pilot's seat a little forward, for a better field of view and to make the interior appear even more spacious. The interior was painted in a dark grey (Revell 77), just like the mortar bays on the shoulders, and received a black ink washing plus many small fake blinking lights and instruments in white, green and dayglo orange. Finally, the section was sealed shut with the very clear canopy that fits very well into its place, and thinned white glue was used to fill the seam.
After the cockpit had been closed, the hull halves were glued together, enclosing the central leg and the movable covers of the mortar bays on the shoulder. Once more I was amazed how well and easily these work - in many cases of these early mecha kits, the mechanisms were very simple and function was rather hazardous. On the Run-Valam, however, the designers put some thought into their construction, and the bay covers include a sliding element, so that the cover - when closed - can be pulled forward a little, and then they open with a generous space margin for the hinge. When shut, they also fit perfectly into their intended space. Impressive!
Some more styrene profiles were added to the hull's bottom because I found the area to look pretty bleak - with the later beauty shots in mind which will certainly have a "frrog perspective" that allows a good look at this area. Some more styrene profile details were added to the cockpit flanks, too. The square relief is OOB, but compared with the box art it's a bit small, so I did some more tuning in this area.
Another anachronistic feature of the Run-Valam is its relatively large cargo basket behind the cockpit. WTF? Who is supposed to load things there, at a height of around 20 m/60'? And the bars are thick as drains - in real life, they must be 6"/15cm in diameter!?
Painting and markings:
At this point the overall painting started. The Run-Valam is apparently overall black with some light metallic trim. But instead of pure/deep black I rather opted for a very dark grey instead of a pure black, namely "Tar Black" (Revell 09). This lighter tone is not obvious, but it allows some more contrast in direct light and some shading effects with black. It also gives the model a slightly worn look.
Due to the small scale and to avoid a bright contrast, I used a mix of Revell 77 and 99 (Dust Grey and Aluminum) for the trim. The model received a black ink washing, and recesses and molded air intakes were painted flat black. Then the parts received a streaky coat with Revell 06 (Anthracite), applied vertically, a tone that's slightly lighter than the Tar Black, for an even more worn and uneven look, but the effect is very subtle. Another treatment was an overall rubbing with grinded graphite, so that the surfaces and esp. the edges took on a dark, metallic shine. Not certain if that's recognizable at all, though. Next came some dry-brushing with Revell 77 was done the the details and edges of the model, before the improvised decals were applied.
These come from all sorts of sources, including some aircraft, Macross and Ma.K. stencils. The tactical code "VF-83" had to be improvised, too. It consists of a 1:72 Macross VF-1 "VF" on the legs, the best thing I could find that would match the space. The sheet where these decals came from dates back to 1982, older than the Run-Valam kit itself, and they were still good! The small white "83" on the lower hull and the serial number on the outer hip fairing ("160083") came from a TwoBobs 1:72 T-2C sheet, from a Hellenic Buckeye.TwoBobs 1:72 T-2C sheet, from a Hellenic Buckeye.
But things were not finished yet: the decals were sealed with acrylic varnish and then I added some dust residue to the lower legs and the feet. It took a while to figure out a mehthod that would not look too much out-of-scale, standard techniques like dry-brushing or pigments were ruled out. I eventually tried simple water colors (Burnt Umbra) that was applied to the areas and immediately patted dry with a soft cotton cloth, so that most of the pint pigments remained in the recesses and a soft haze over the outer surfaces. Again the effect is rather subtle - but remember the sheer size of this mecha! Dirt would not get much higher than the feet, IMHO, and in soft/wet terrain the thing would immediately sink and propably topple over...
When this was dry, the whole model was sealed with matt acrylic varnish. At this stage I also painted the red "lamps" all over the hull and the (what I think they are) headlights under the cockpit. In both cases the areas were laid out with silver paint and then translucent paint in red and white were added.
As a final step some more dry-brushing was done, very lightly with only a little acrylic bright silver esp. on the feet and around the hull's edges. Again, this was done very sparsely due to the mecha's bulk in real life, I just wanted some supreficial signs of action.
A nice build, and I am happy with the result - even though getting my hands on one of these kits (at a reasonable price) was the biggest challenge. And even though the kit lacked the decals, I think that the improvised markings do not look out of place. It's uncertain if only a single "Run-Valam" existed in IMAI's Megaro Zamac universe, but this rather looks like a standard infantry item and not a glorious one-off battle robot, so I am fine with that. And the rest stayed as close as possible to the original, even though some changes and visual enhancements were made. I am also very proud that I managed to make the model fully posable: every joint works, and the whole thing is stable enough that it does not collapse under its own weight! :D